
The Custom Report Writer allows you to create your own custom reports for use in the MLS.
To access this feature
Getting familiar with the Custom Report Writer window
Toolbar – Located at the top of the window, the toolbar contains many functions and short cuts. For example, you can specify a name for your report, select the property type the report will be used for, and even select font sizes and colors.
Task Pane – located on the left side of the window, the task pane lets you "switch" between several different tabs (click a tab header to switch to that tab). See below for details about each tab.
Report Manager
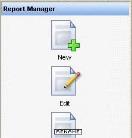
The items in this tab allow you to create and manage your custom reports. Once you have selected a function, the software will automatically take you to the next step in the report management process.
For example, to begin creating a brand new
report from scratch, click New  . You will notice that the
task pane automatically switches to the Fields tab, and the work area
changes to display a report layout with grid guides.
. You will notice that the
task pane automatically switches to the Fields tab, and the work area
changes to display a report layout with grid guides.
All other items under this tab allow you to manage reports that you've already created. These functions appear to be unavailable (low-lighted) until you have selected a report from the work area by checking the box to the left of the report (see "Work Area" below).
TIP: When creating a new report, first check to see if you have any existing custom report that are similar to the report you want to create. If so, you can save time by copying the already existing report, and then using the Edit tool to complete your changes.
Fields
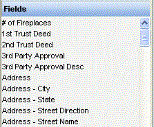
This tab displays all of the data fields that are available for use on your custom reports, in alphabetical order.
Click on a field to add it to the report layout. Then use your mouse to "drag" the field where you want it to display on the report.
IMPORTANT: Available fields are based on property type. Make sure you have selected the desired property type before adding any fields to your report layout.
NOTE: Some listing information has been broken out into several fields, such as Address. This gives you more flexibility to arrange your report in just the format you want.
Images
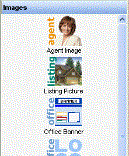
This tab allows you to add pictures and other images to your custom reports. For example, you can personalize your reports by adding your agent photo or office banner.
Click the desired image type to add it to the report layout. Then right-click the image on the report layout to move it to the desired section, if necessary.
NOTE: Custom reports that include listing pictures will display the primary listing picture only (additional pictures cannot display on custom reports).
Tools
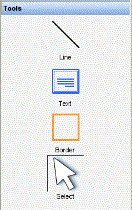
This tab contains several tools designed to help you further customize your reports.
Click the desired tool to activate it for use in the work area. The mouse pointer changes based on the active tool.
Use the Line tool to “draw” horizontal lines on your custom report.
Use the Text tool to add your own custom text anywhere on your report.
Use the Border tool to "draw" a border around a field or group of fields.
Use the Select tool to move or resize items that you have placed onto the report layout.
Work Area – the main portion of the Custom Report Writer window is your work area.
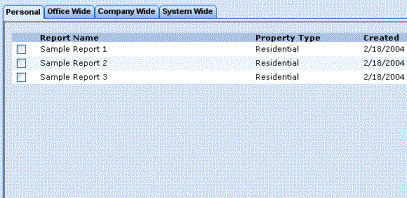
Each time you open the report writer, the work area displays a list of your available custom reports.
Four tabs at the top of the work area organize reports based on their “viewable level.” For example, reports that are listed under the Personal tab can only be viewed by you; reports listed under the Office Wide tab can be viewed by everyone in your office, and so on. Click a tab to see the reports listed under that tab.
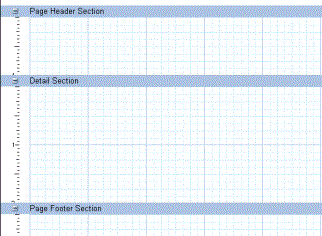
When you are creating a new report (or editing an existing report), the work area changes to display report sections and grid guides. This is where you place fields and other items (such as pictures) that you want on your report.
NOTE: When you add fields, images or other items to your report, they are automatically added to the “Detail Section.” To move these items to either the Header or Footer sections, right-click with your mouse on the item and select the area you want to move the item to.

TIP: ![]() View the Learning Center video tutorial "Custom Report Writer" for a quick overview of this feature. From
the Help menu, choose Learning Center,
then select Custom Report Writer.
View the Learning Center video tutorial "Custom Report Writer" for a quick overview of this feature. From
the Help menu, choose Learning Center,
then select Custom Report Writer.
![]()